We’ll soon welcome Chinese New Year 2019, which is the Year of the Earth Pig! Individuals born under the sign of the pig are considered to be easygoing, trustworthy, and cheerful. They’re born in the years 2019, 2007, 1995, 1983, 1971, 1959, 1947, 1935, and 1923
The agreeable Pig is known to bring success in all aspects of life, which means every zodiac sign can expect a year of joy, friendship, and love. It is also a great year for financial growth, so why not usher in more prosperity by making your own Chinese New Year decorations?
Here are 10 simple DIY crafts and gifts to give your home a joyful atmosphere!
Pig-themed DIYs
1) Piggy Fan
This is a super functional DIY, perfect for Singapore’s hot weather. Do make a few; the little ones will want to take this adorable fan.
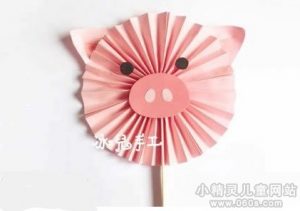
Image Courtesy of
060s.com
You’ll need:
4 sheets of light coloured A4 paper (Pink, or light beige works best.)
1 sheet of darker pink A4 paper
1 sheet of black paper
Glue
Optional:
Chopsticks | Googly eyes | Hot Glue
Step 1: Fold the 3 sheets of light pink paper into accordion shape. Then fold in half.
Step 2: Glue 3 sheets together to make a circular fan shape. Make sure to align the edges neatly to form a neat circle.
Step 3: Make the ears by cutting 2 identical right-angled equilateral triangles from the dark pink A4 paper. At the middle of the base, make a straight vertical cut, approximately 5cm. Overlap and glue the newly formed edges to make the ears 3D.
Step 4: To make the trotters, repeat step 3 with black paper.
Step 5: If you don’t have googly eyes, cut 2 small circles (2-3cm diameter) from the black paper.
Step 6: Make the nose. Cut a big oval shape from the dark pink paper, then 2 small oval shapes from the light pink paper.
Step 7: Glue everything together! Use hot glue to stick a pair of chopsticks to the back to help your guests cool off on a hot day.
2) Bottle Piggy Bank
Got extra coins or have young children who need to learn how to save? Reuse some plastic bottles and make this cute piggy bank!
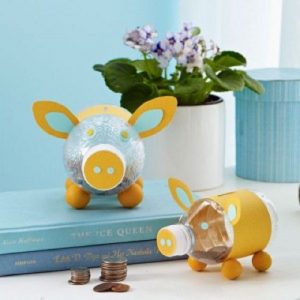
Image courtesy of
coolcrafts.com
You’ll need:
An empty plastic bottle (500ml)
Hot glue gun
2 different coloured A4 sheets of paper
1
pen knife
1 pencil
Double sided tape
1 toilet roll
Hole puncher
Step 1: Using a pen knife, shorten the bottle by carefully cutting two rounds around the middle of the bottle.
Step 2: Cut a 0.8cm x 3cm rectangular slit into the new edge of the lower half bottle.
Step 3: Using the hot glue gun, add a thin line of glue to the sharp edges. Then connect the 2 halves of the bottle with the hot glue.
Step 4: Make the nose by tracing the bottle cap on the darker piece of paper, then cutting out the round shape. Then use the hole puncher to punch 2 small circles from the lighter piece of paper.
Step 5: Make the eyes. Punch out 2 small circles from the darker piece of paper. Then cut out 2 slightly larger circles from the lighter piece of paper.
Step 6: Make the ears. Cut out 2 identical right-angled equilateral triangles from the darker paper, then 2 smaller triangles from the lighter paper. Using double sided tape, stick the lighter triangle onto the darker triangle. At the middle of the base, make a straight vertical cut, approximately 5cm. Overlap and glue the newly formed edges to make the ears 3D.
Step 7: Make the body cover. Cut a wide strip of paper to go around the bottle.
Step 8: Make the feet. Cut the toilet roll lengthwise to form 4 identical loops. Cut the loops to form 4 long strips of card. Tightly roll the 4 strips of card, and fix the shape with double-sided tape. Then cut 4 rectangles from the darker paper, approximately 3cm x 8cm each. Wrap the card rolls with dark paper strips.
Step 9: Assemble. Stick the body cover onto the bottle with a few strips of double-sided tape, then cut the paper a little to reveal the coin slot. Stick on the rest of the body parts.
3) Pig planter
We know, earth-toned pots look a little boring. Give your plants a pop of colour by making this cute planter!
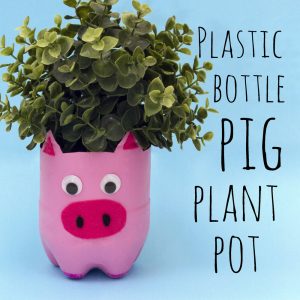
Image courtesy of
doodleandstitch.com
You’ll need:
1 empty plastic bottle (1.5l)
A pair of strong scissors
Pastel paint
Paint Brush
Googly eyes
1 marker
Hot glue gun
Step 1: Cut off the top half of the bottle.
Step 2: Using a marker, draw a line around the bottle. Draw 2 triangles to form the ears.
Step 3: Cut along the line to form the face of the pig. Use the hot glue gun to smooth rough edges.
Step 4: Cover the bottle with 2 coats of pink paint. Let dry, then paint the nose and ears. Let dry.
Step 5: Stick on the googly eyes! Done!
4) Easy foil deco
If you’re not very good at handicrafts or calligraphy, but can make simple graphics on the computer, here’s a super easy option: foiling! You can easily print your own customised Chinese couplets and Chinese New Year greeting phrases.
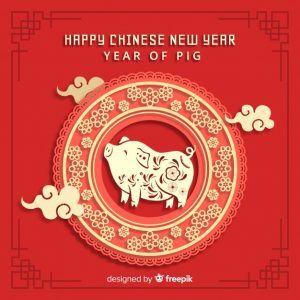
Image courtesy of
freepik.com
You’ll need:
Thermal deco foil (Minc or iCraft works fine)
Laminator
Baking sheets
Laser printer (MUST be a laser printer that uses toner.)
Stock graphics (or your own designs)
Paper (Solid colour, or custom printed with inkjet printer.)
Optional: Photo or picture frame. (Maximum A4 size.)
Step 1: Find Chinese New Year stock graphics online and/or customise your own. The recommend size limit is A4, or the dimensions of your photo frame.
Step 2: Print the design in black-only using the laser printer. (It has to be a laser printer, as the foil needs the toner to stick onto the paper.)
Step 3: Place the foil on top of the area you would like to be shiny.
Step 4: Cut an A3 sized piece of baking sheet. Fold into half to form an A4 folder.
Step 5: Sandwich the foil and printed paper with the baking sheets.
Step 6: Laminate. Slip in the paper sandwich folded edge first.
Step 7: Pull off the excess foil. Display with the photo frame!
Bonus: Naturally, you can adapt this method to make personalised greeting cards, too. If you would like more colours and patterns, print the coloured background with an inkjet printer first. (Feel free to make the most of your laminator and adapt this technique for other festive occasions, too!)
For those of you who want to reuse Chinese New Year decorations, here are some non-pig-themed DIYs!
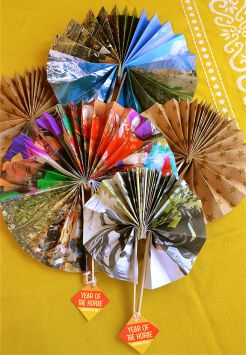
5) Ang Pow Pineapple
Pineapples are considered auspicious because “pineapple” sounds like “prosperity comes” in the Hokkien dialect. For an extra prosperous feel, use red packets with prosperity-related Chinese characters!
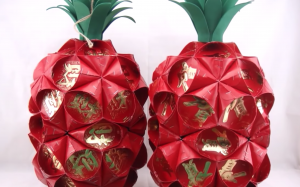
Image courtesy of
Skymagenta Craft
You’ll need:
45 identical ang pows (We’re giving away these cute God of Fortune ang pows this year! Available when you shop in-store at Giant!)
Stapler (and a lot of staples)
2 sheets of green construction paper
1 toilet roll (Cut into half, to form 2 loops)
1 metal ruler
Strong string to hang the pineapple with
Optional: Tape, Tassels/small hanging decorations to hang from the base of the pineapple.
Step 1: Prepare all the ang pows. Find the midpoints of all 4 edges, then fold the corners along the imaginary lines.
Step 2: Form the top of the pineapple, by joining 5 ang pows into a circle. Align the edges neatly, and staple as close to the folds as possible.
Step 3: Fold the string in half and slip into the hole in the middle. Tie a knot on the “inside” of the pineapple, and staple to half the toilet roll to prevent the string from slipping out.
Step 4: Connect one ang pow to the bottom edges of two adjacent ang pow. Complete the layer by adding 4 more ang pows. You should see a neat circle of three 120-degree angles.
Step 5: Staple 2 separate ang pows together. Make 5 units of this.
Step 6: Attach the units of 2 ang pows to the edges of 2 adjacent ang pows on the large structure. Repeat to complete the layer. You should see a neat circle of 5 connected ang pows.
Step 7: Repeat steps 2, 4, 5, and 6 to make the bottom half of the pineapple. If you have nice little tassels or small ornaments, feel free to string them through, and fasten with tape.
Step 8: For the top half only, repeat step 4.
Step 9: Connect the two halves.
Step 10: At every connection point, separate the edges. Staple each edge with the opposite edge of the same ang pow.
Step 11: Make the pineapple leaves. Cut long saber like shapes from the green construction paper. Stick around the remaining half of the toilet roll, staggering the heights a little.
Step 12: Slip the ring of leaves onto the string, on top of the pineapple body. It’s ready to go!
6) Ang Pow Fortune Disc
While many families may put up the “fu” character (which means good fortune) on their doors during Chinese New Year, they rarely hang it the “correct” way, which is upside down. The word for “upside down” sounds like “has arrived” in mandarin. Hanging the “fu” character upside down thus means “good fortune has arrived”. So, be sure to hang this beautiful disc the right way!
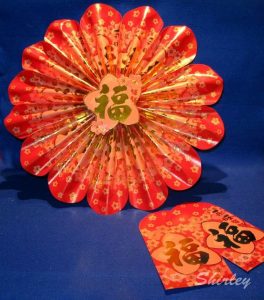
Image courtesy of
Shirley Yeung on Pinterest
You’ll need:
12-20 Ang Pows (Even number)
Scissors
Glue or double-sided tape
A “Fu” character decoration
Step 1) Open up the flap, flip the ang pow front side down, then fold the ang pow in half.
Step 2) Fold the short bottom edges up to meet the center fold.
Step 3) Cut off the 2 triangular corners.
Step 4) Fold the new edges to meet the middle fold.
Step 5) Flip over. Fold the new folds to meet the middle fold.
Step 6) Flip back. Overlap the smallest flaps, and staple.
Step 7) Repeat Step 1-6 to make 12-20 units.
Step 8) Assemble. Align the edges and stick the units together.
Step 9) Stick the “Fu” character in the middle of the ring.
7) Origami vase covers
Stuck with plain glass bottles for your nice CNY flowers? Just make it festival-appropriate with the vase covers!
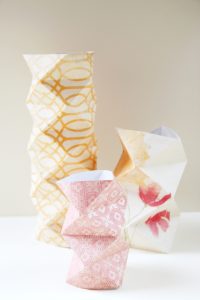
Image Courtesy of
GatheringBeauty.com
You’ll need:
Printed drawing block or wrapping paper. At least 30cm x 30cm.
Glue or fabric tape
A bottle or a tall slim glass
Optional: Clean ruler to strengthen the fold, scrap paper to practice with
Step 1) Cut the paper into a square. With the pattern side up, fold in half.
Step 2) Unfold, and then fold both edges to meet at the middle fold. You should now have 4 equal vertical parts.
Step 3) Make more folds to form 8 equal vertical parts.
Step 4) Flip the paper, pattern-side down. Fold the paper in half diagonally.
Step 5) Fold the bottom edge to meet every odd vertical fold.
Step 6) Repeat step 5 for every corner.
Step 7) You should now have a sheet of paper covered with triangular folds. Time to form the vase!
Step 8) Flip the paper pattern-side up, and gently bend to form a tube. The shape should start forming naturally, just encourage the folds.
Step 9) Overlap the edges, then stick together.
Step 10) If needed, cut out rows of triangles to better match the height of the glass. Then place the glass in the middle of the vase.
8) Simple Chinese New Year firecracker wall hanging
Need to keep slightly older kids busy while you do the chores? Let them try this one; minimal supervision needed, and it helps the kids feel involved.
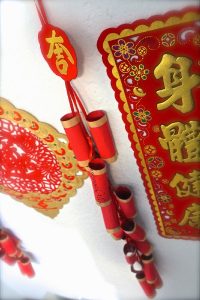
Image courtesy of
Wander with Alice
You’ll need:
Toilet paper rolls (without the paper)
Red coloured paper
Gold coloured paper
Watercolour pens
Glue
Scissors
Red ribbons
Tape
Step 1: Wrap 10 empty toilet paper rolls with gold coloured paper.
Step 2: Cut rectangular strips of red paper and glue them over the gold one, leaving a ring of gold at the top and bottom of each tube.
Step 3: Cut a big circle from the red coloured paper and write festive Chinese character in the middle using a black watercolour pen. (Not happy about your handwriting? You can print the character you want before you cut!)
Step 4: Put the ribbon through each toilet paper roll as shown in the image, then tape the red circle on the top. Allow some ribbons to stick out from the top if you want to hang your decoration on the wall.
9) Circular Chinese lantern
If you want to make really amazing Chinese New Year craft decorations, then this is for you. It is harder to make than the Chinese lantern mentioned above but the extra effort is certainly worth it.

Image Courtesy of
Homemade Gifts Made Easy
You’ll need:
White paper
Gold or red coloured paper
Fine permanent marker
Red string
Needle
Scissors
Step 1: Print this Chinese ball lantern template on white paper. Cut it out and then use it as a stencil to trace the lantern shape onto red or gold coloured paper.
Step 2: If preferred, write auspicious Chinese characters using fine permanent markers.
Step 3: Assemble the lantern. Thread some red string through a needle. Run the needle through the bottom row of small circles on the lantern template. You’ll want to go from left to right, piercing each circle from back of the paper to the front. Tie a knot.
Step 4: Repeat with the top row of circles.
Step 5: To hang the lantern, add another piece of string by tying it onto the knot you have just made. For more wow factor, make a chain of lanterns by tying them onto a piece of string.
Bonus: Use our limited edition Giant God of Fortune Red Packets to create your Chinese New Year decorations!
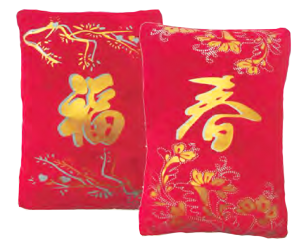
10) Chinese New Year themed cushions
Want extra huat for your year? You can look up your lucky color for 2019 and tweak your DIY crafts to use that color. Then you can complete your Chinese New Year deco with these lovely CNY cushions.
Chinese New Year DIY decorations may take time and effort, but they will certainly be unique. Here are three tips to make your craft time easier:
- Read the instructions carefully and mentally visualise the process.
- Before you start, gather all your materials. Prepare extras if you’re doing the DIY for the first time and find substitutes if needed.
- If you find old decorations while spring cleaning, try reusing parts of existing items. Especially if they are hard to hand make and in good condition.
No matter which DIY you choose to complete, just have fun! Of course, if you prefer to focus on food rather than decorations, we have ready-made decorations in stock and
Chinese New Year recipes for you. While you’re at it, you can always check out our Chinese New Year promotions.