Christmas is the most wonderful time of the year. It is all about family, friends, wonderful decorations, great food, and gifts. You want to plan dinner for the family or throw a party for your friends. It is also the time to go all out on decorations. The Christmas tree is just the start. If you’re busy at home, at school, or on the job, it’s hard to find the time to make your home festive for the holidays. In this guide, we share 10 clever DIY Christmas decorations to make your holidays merry and bright on a budget and in quick time!
1)Ribbon Star Decoration
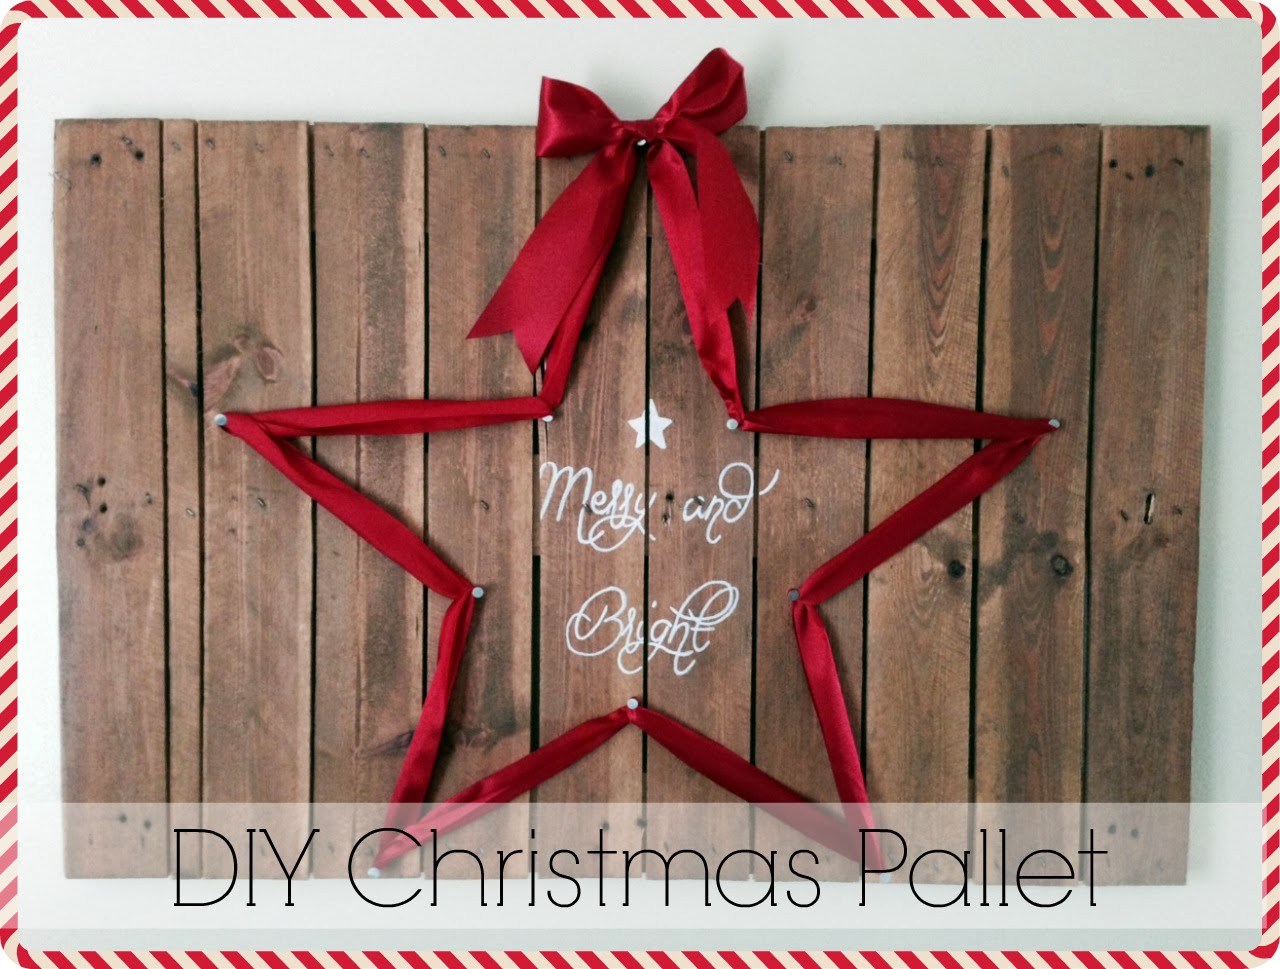
Photo By:Homemade Modern
This is a quick and easy Christmas decoration project that you can make with a lot of common household items. It can be used to welcome friends and guests by hanging on your front door. Other great ideas are to hang the star over your fireplace or on your wall. Get creative!
Materials: ribbon, nails, wooden pallet or corkboard, measuring tape, tape
Directions:
- Using a pencil, sketch a five-pointed star of your desired size roughly onto the wooden pallet.
- Measure the length of one of the ‘arms’ of your star.
- Cut five strips of tape that are this length and use those to create a five-pointed star. If you want a more polished look, be very precise.If you are going for a more rustic look, allow yourself to be a more flexible with measurements.
- Hammer a nail into each of the four points. Remove the tape from the pallet, leaving the nails in place.
- Leaving a tail of ribbon at the top of the star, wrap the ribbon around each nail until the star-shape is outlined in ribbon.
- Finish by tying your tail end into a bow at the top of the star. If desired, use a permanent marker to write a Christmas message or create a design at the centre of your star!
Price: If you already have a wooden pallet or corkboard at home, you can complete these homemade Christmas decorations for about $7.
2) Rustic wooden star
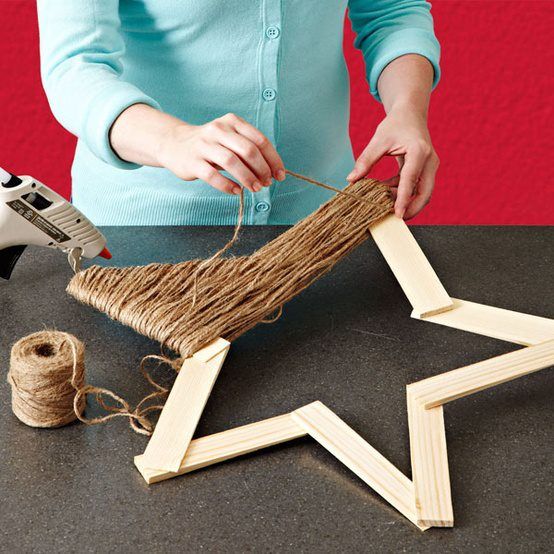
This simple Christmas decoration project can produce the star for the top of your Christmas tree, the centrepiece of your Christmas table, or a rustic decoration for your wall. If you use superglue or hot glue, these are also rugged enough to be displayed outside: tucked into a pine tree, sitting on your porch, or perched on a window. Watch the video tutorial here
You need: old wooden rulers/popsicle sticks, disposable wooden chopsticks, any wooden dowels of the same length rustic-style twine, glue
Directions:
- Start by arranging 10 of the wooden dowels in a five-pointed star pattern. Glue these in place with superglue or a good crafting glue and wait for the glue to dry.
- Wrap the twine around the star, leaving a ‘tail’ of the twine, and tucking it into the twine when you get the chance. Keep wrapping snugly, but occasionally use superglue to ensure that the twine does not slip or move.
- Continue until you have wrapped the entire star. If you would like to make it into an ornament, be sure to leave a loop of twine tightly tied together. Display your work proudly!
Price: You can produce a huge number of stars for about $5.
3) Giant paper snowflake
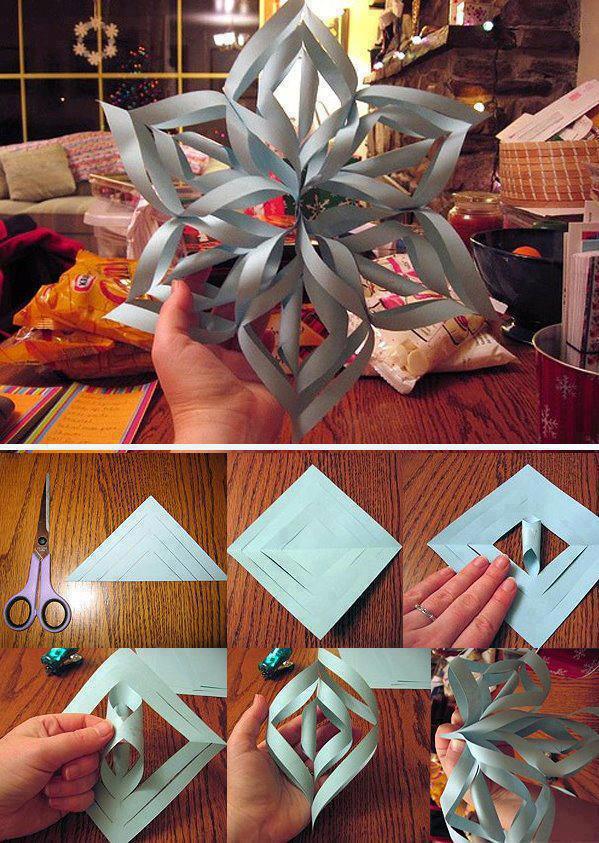
This gorgeous snowflake looks like it took hours to make, but in fact it takes very little time and effort. It can also make a huge impact if you string several together, hang them as homemade Christmas ornaments, or dangle from the ceiling!
You need: scissors, origami paper or any interesting wrapping paper, tape and/or glue, stapler with staples
Directions:
- Fold your paper from top-right corner to bottom-left corner, so that you have a folded triangle.
- Cut upward from the folded side to the unfolded side, following the edges of the triangle closely. Do this on both the right side and the left, but do not allow the cuts to meet. Open your paper.
- Curl the innermost edges together and close with tape or glue.
- Flip the paper over and curl the next layer closed. Glue or tape.
- Repeat this action for the next edges out, and the next edges out until you have curled all of your edges to meet each other and secured with tape.
- This is one arm of your snowflake. Repeat for the other 5 pieces of paper and then attach together using the narrowest ends with tape, glue, or a staple.
Price: The cost of 6 pieces of paper, if you already have scissors at home! If you have to purchase a new pair of scissors, it’s about $1.25.
4) The warmth of Christmas ornament
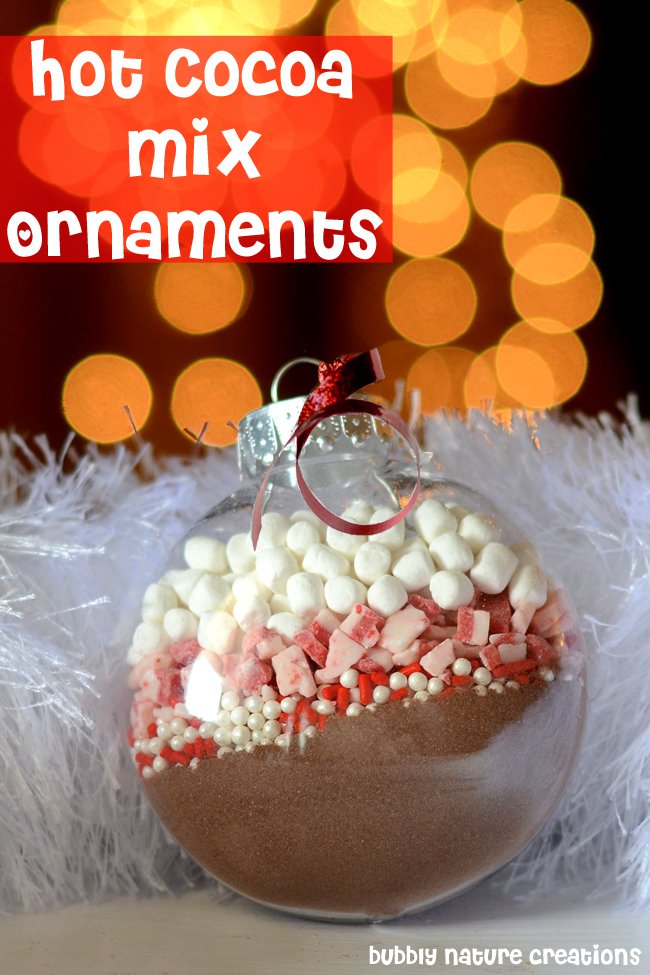 Photo By: Pioneer Settler
Ah, Christmas: friends, family, the rustle of the fire… and the warmth of hot cocoa! Hang these on the tree, give them as gifts, or use as party favours. This is by far one of the easiest and most fun Christmas ornaments to make if you have kids at home!
You need: clear glass Christmas ornaments, mini-marshmallows, hot cocoa mix, sprinkles or crushed candy(optional)
Directions:
- Clean the outside and inside of the glass ornament thoroughly with soap and water before use.
- Pop the top of the ornament off and add the hot cocoa mix, then candy, and finally the marshmallows.
- Decorate with a ribbon if desired.
Price: The price of this project will depend on your glass ornaments, but you can make a dozen of these glass ornaments for $17.70, or less than $1.50 each! This makes them a quick and easy gift for parties or those at the office.
5) Cinnamon hearts
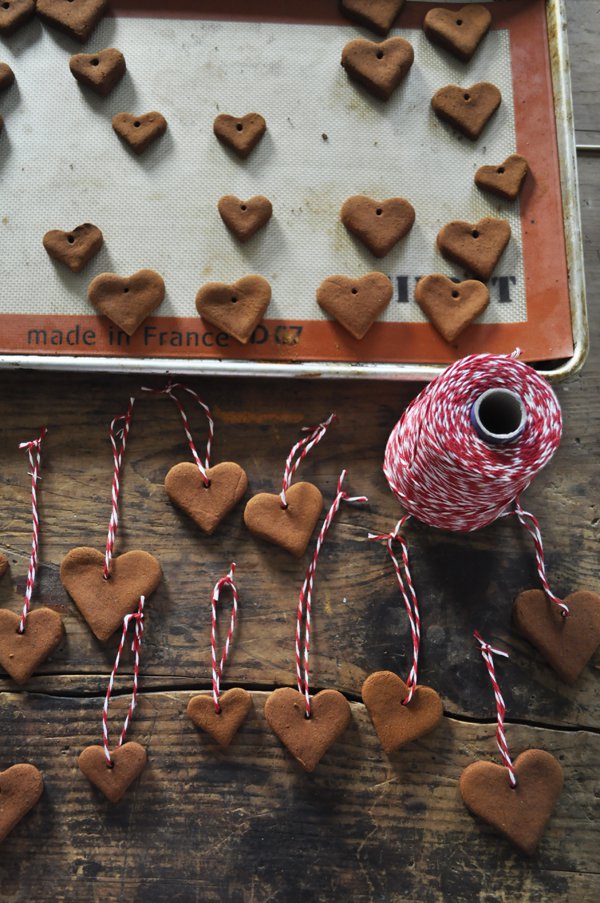 Photo By: Katy Elliott
Nothing says Christmas like the smell of cinnamon from homemade Christmas ornaments baking in your oven! Read on to discover how to make Christmas ornaments that will keep your friends asking what delicious treat you’re baking!
You need: 1 cup of applesauce or 1 container applesauce baby food, 1 1/2 cups of cinnamon powder (you’ll need two of these packages), 1 T ground cloves (or grind 2 T whole cloves with a spice grinder), cookie cutters, string, mixing bowl, rolling pin, cookie sheet
Directions:
- Add 1 cup of the cinnamon and 1 cup of the applesauce. Mix and knead together well.
- Add the rest of the cinnamon and the cloves.If it gets too crumbly, add a bit more applesauce. If it’s too wet, add more cinnamon.
- Scatter some cinnamon to ensure the dough doesn’t stick, and roll out the dough to 1/4″ thick.
- Cut out shapes with your cookie cutters. If your dough is too wet, the edges won’t be clean. Add more cinnamon as necessary. Don’t forget to put little holes in your shapes, so that you can string them up later!
- Place in a 200-F oven on a cookie sheet for about an hour (sometimes more). Let these set overnight; they should be rock-hard.
- Put string or ribbon through the holes and use the hearts as fragrant ornaments!
Price: $9.30 to make about 30 ornaments that will smell fabulous for many Christmases to come! (That’s $0.31 per ornament!)
6) It’s beginning to smell a lot like Christmas
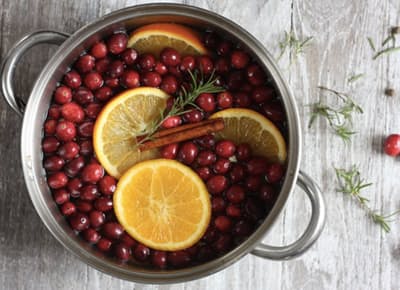 Photo By: Purewow
This fragrant pot will ensure that your home or apartment smells wonderful and festive all December long!
You need: 3 cinnamon sticks, 1 orange, sliced 2 tsp nutmeg, 2 tsp cloves, 1 cup cranberries (fresh if available), rosemary sprig
Directions:
- Fill a pot with 2 – 3 cups of water and add all ingredients.
- Simmer on low whenever you want that special Christmas scent! Add more water throughout the day as necessary.
Price: It’s about $9 to make your home smell like the soul of Christmas!
7) Candy Cane Wreath
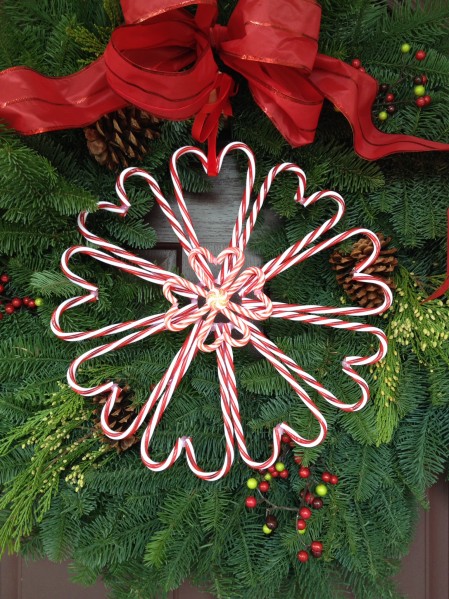 Photo By: Fabart DIY
This is a fun, simple, incredibly inexpensive way to decorate your door for the holidays, and a fun gift to give to a friend or neighbour before Christmas.
You need: full-sized candy canes, miniature candy canes (optional), tape or
superglue, ribbon (optional), cardstock (optional)
Directions:
- Place two candy canes back to back, with the canes arching to the left and right; tape these together.
- Repeat until you have multiple pairs of canes; then, begin to line them up so that they form heart-shapes. Glue or tape the hearts together. (Optional) Use ribbons to further secure the candy canes to one another and make your candy cane wreath look even more beautiful!
- There are two ways to make your wreath look meticulous, even if your candy canes may not all be exactly the same shape and size.
- Follow the same process with miniature candy canes and secure to the centre of your larger wreath. This will cover any inconsistencies.
- You can also cut out a circle from thick cardstock and write a Christmas message in the centre, then glue it so it covers the centre of your wreath.
Price: $4 – $5
8) Christmas tree napkins
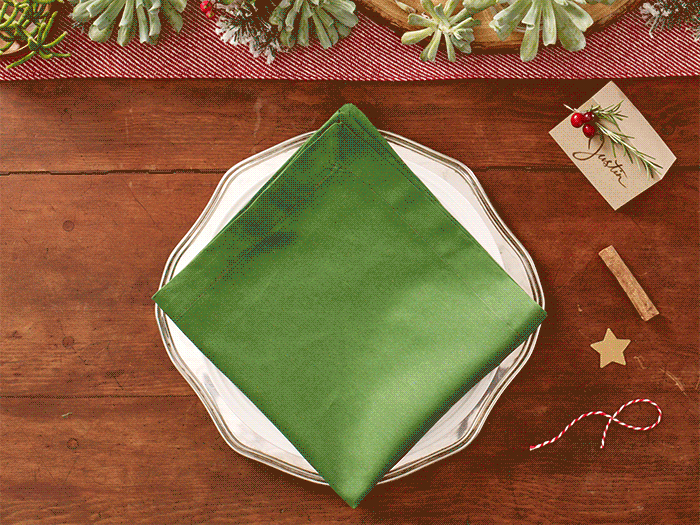 Photo By: Social Apps
Make your holiday party special and impress your guests with these handmade Christmas decorations!
You need: green napkins, cinnamon sticks
Directions:
- Fold your napkin in half two times, and lay on your plate with the open side pointing up.
- Fold the first flap down toward the bottom of the plate.
- Fold the second flap down over the first flap. Let a bit of fabric show between the two layers.
- Repeat with the remaining napkin folds.
- Tuck the right corner under so that the ends meet the edge of the left-hand, bottom side. Do the same on the left.
- Starting at the top of your tree, begin to tuck each layer under itself.
- Stick the cinnamon stick between the last two folds to serve as a tree trunk. Be creative with what you’d like to go at the top of the tree. A nonpareil, a marshmallow, or a tiny cookie star are all creative choices!
- You can also put wrapped candies or squares of chocolate at the bottom for ‘gifts’, or tie a tiny ribbon around your cinnamon stick.
Price: Incredibly inexpensive at less than $2 for a forest of napkin trees, this is a small task that could go a long way to creating a Christmas party your friends will remember! For more detailed instructions, see the step-by-step guide with images here.
9) Hot Chocolate Stirring Sticks
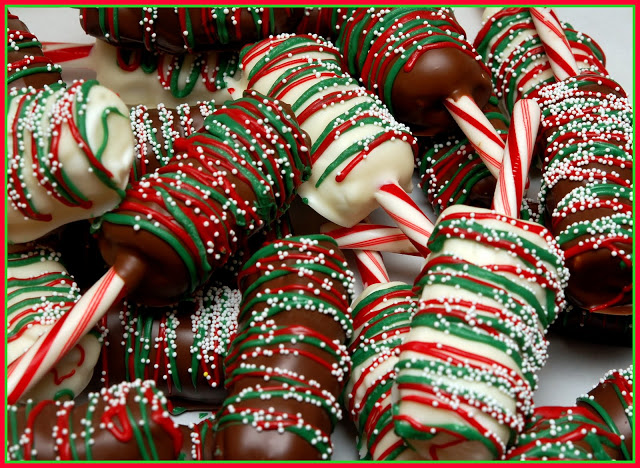 Photo By: Hug and Cookies
What could be more inviting than chocolate, marshmallows, and candy canes for Christmas? Although they can be used to stir hot chocolate, they also make a great treat on their own.
You need:
large marshmallows, chocolate chips, candy cane toppings of your choice, microwave-safe bowl
Directions:
- Place a marshmallow on the end of an unwrapped candy cane.
- Heat a bowl of chocolate chips in the microwave for about 1 minute. Stir the chocolate together. If the chocolate is not yet smooth, put in the microwave again for another 30 seconds.
- Dip the marshmallow into the warm chocolate.
- Roll the marshmallow into any toppings you desire.
- Place the marshmallow into a
clear plastic bag and tie with a ribbon, or serve right away.
Price: Between $7 and $10 makes about 24 stirring sticks. That’s just $0.29 – $0.42 per treat!
10) Haunting Outdoor Christmas lights
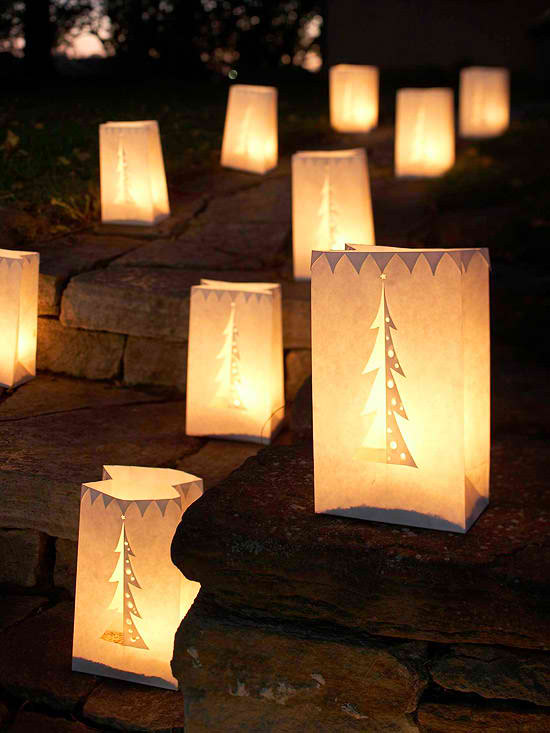 Photo By: Decoholic
In order to get a gorgeous outdoor light show, many pay hundreds of dollars. Why, when you can use paper bags instead? No, really, check these out! These are easy Christmas decorations to make, and very striking.
You need: paper bags,
scissors, craft knife or hole punch, small LED lights or votive, candles, pencil
Directions:
- Draw your desired pattern onto the bag in pencil.
- Use the scissors to cut out larger shapes. Use the hole punch to pop out holes to represent the Christmas tree ornaments.
- Cut the top of the bag in a jagged pattern. Fold the edge over. Be careful not to rip it!
- Place a candle or small LED light in the bag.
- Arrange along your walkway or corridor.
Bonus: Cookie Christmas Tree
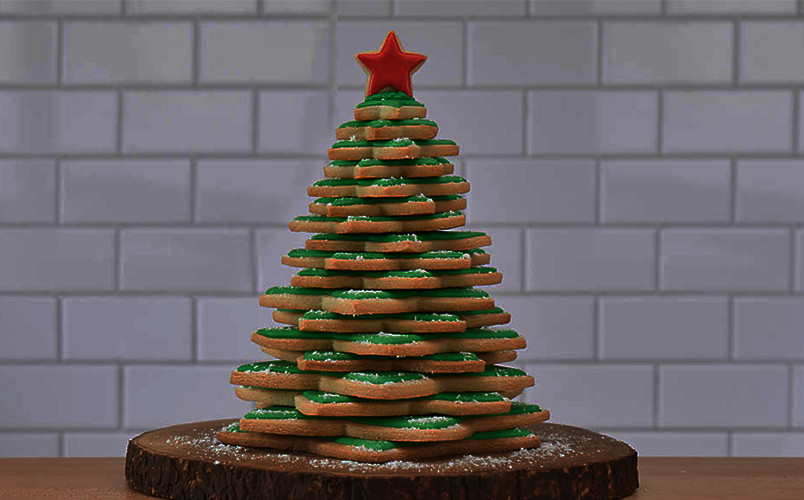 Photo By: Social Apps
This is a great project to do with kids, though it takes a little prior planning.
You need: your favourite sugar cookie recipe frosting,
icing sugar, a platter, cookie cutters (it works best if you can get various sizes, but if you can’t then just vary the number of cookies), rolling pin.
Directions:
- Roll out your sugar cookie dough to the same thickness (about 1/4 “).
- Cut out most of your dough using a snowflake or star cookie cutter.
- Cut out two star-shapes and pare them down so that they are noticeably smaller than the others.
- Bake your cookie according to the instructions on the package and wait for them to cool.
- Sprinkle your platter with icing sugar.
- Arrange your cookies in a wide circle on the platter. This will be the ‘base’ of your tree.
- Frost the cookies and then place a second layer of cookies on top of them. Be sure to alternate the ‘points’ of your cookies so that the bottom level and the top do not jut out in the same places.
- Continue creating your tree with fewer and fewer cookies until you reach the top of your tree. Use one of your tiniest cookies flat at the top of the tree.
- Dust the tree with icing sugar. Use a generous dab of frosting to stick the last star atop the tree, upright.
Price: About $10.75 if you have to purchase the cookie cutters.
There you go! We hope you loved these 10 awesome DIY Christmas Decorations. Now go forth and make this Christmas beautiful, bright, and full of warmth!